Before following the following guide, make sure the position of the PC / laptop and LAN cable are correct as shown above.
Topology:
wall jack <—> (Internet/WAN port) router (Ethernet 1-4 port) <—> laptop / PC
<—> = LAN cable
Tool :
- PC/laptop with Dynamic IP
- Cable LAN
- Router
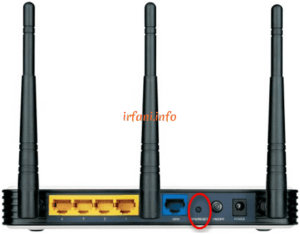
- Connect the LAN cable from the PC/laptop to the LAN port (1-4) on the router and make sure the status on the PC/laptop is connected and there are no crosses.
- Connect the LAN cable from the building/apartment/wall jack to the WAN/Internet port on the router.
- Open a browser to log in to the router by typing 192.168.0.1 (default IP) in the Address Bar, then Enter, make sure you know the username and password. If you have logged in, please go directly to step 5 but if the address 192.168.0.1 is not open or does not remember the router username and password, it is recommended to reset it (step number 4).
For other types of routers, you can see it on the sticker installed under the router.
- To reset the router as it defaults, make sure the router is on and press the reset button on the back of the router for 5-10 seconds until the light indicator will flash at the same time.
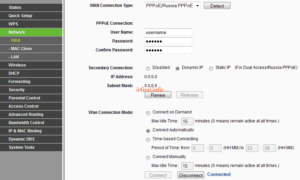
- On the left panel, select Network – WAN and then select / fill in with:
WAN Connection Type : PPPoE/Russia PPPoE
User name : username-login
Password : password-login
Confirm password : password-login
Wan Connection Mode : Connect Automatically
After that, click Connect and make sure the status is Connected then click Save.
Until this step should be connected to the Internet, please try to open a site first, if successful please continue to step number 6 for wireless configuration.
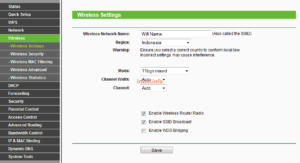
- On the left panel, select Wireless – Wireless Settings then select / fill in the following information then click Save.
SSID : wireless name
Region : Indonesia
Channel : Auto
Mode : 11bgn mixed
Channel Width : Auto
Max Tx Rate : 300 Mbps
Enable Wireless Router Radio : check if you want to activate the wireless feature
Enable SSID Broadcast : check if you want to display the wireless name
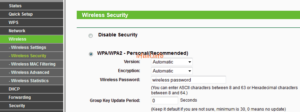
- To change the wireless password, select Wireless – Wireless Security on the left panel then select the fill in with the following information then click Save.
Select WPA-PSK/WPA2-PSK.
Version : Automatic.
Encryption : Automatic.
PSK Password : wireless password (minimal 8 character).
Until this step, you have successfully connected to the Internet via ethernet and wireless cables by entering the password first (for wireless).
Note :
There are some devices that are not compatible with the above configuration, you can do this manually by changing the selection that suits the device.
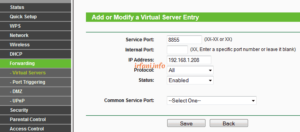
- If you want to use CCTV or other devices that require the Port Forward feature, select Forwarding – Virtual Servers on the left panel then click Add New and fill in the following information then click Save:
Service Port : the port or range port to be used.
IP Address : The IP address of the device to be connected.
Protocol : All
Status : Enabled
Note :
Not all ISPs open the ports that will be used by the CCTV / other devices, for that you can consult the relevant ISP first.
Tested with TP-Link TL-WR941N / TL-WR941ND
Firmware Version : 3.11.8 Build 100609 Rel.61214n
Hardware Version : WR941N v2/v3 00000000
Can be used for:
TL-WR940N
TL-WR843ND
TL-WR842N / TL-WR842ND
TP-Link TL-WR841N / TL-WR841ND
TL-WR1043ND
TL-WR840N
TL-WR841HP
TL-WR743ND
TL-WR740N / TL-WR741ND
TL-WR710N
TL-WR720N
TL-WDR4300


