Import Emails from Outlook Express to Ms. Outlook 2003

Import Emails from Outlook Express to Ms. Outlook 2003

Microsoft Outlook Express 6 (MSOE6) is  a free basic email program from Windows XP.

In Outlook Express, each email folder is stored in a single file (DBX). For example, the Inbox folder in Outlook Express is a single file, Inbox.dbx, Sent Items folder, Sent Items.dbx. In contrast, Ms. Outlook (MSO) stores each message as an individual file.

The maximum DBX file size  is 2 GB and this can cause some serious problems (generally too fast to fill) if the user is actively communicating via email. For this reason, I will switch the MSOE6 program to MSO so that you are more flexible in using email, the way is by importing email messages  and account information from MSOE6 to MSO.

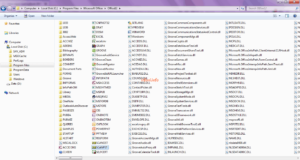
If Outlook Express and Ms. Outlook are installed on the same computer, you need to know this information so that you can find and copy the correct folder when needed. I started it through Ms. Outlook because it was easier (in this case it was my first time using Ms. Outlook 2003 after installation).

Here is the guide:

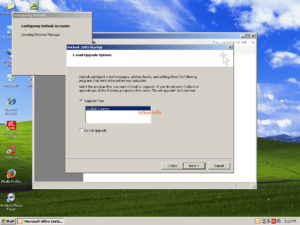
  1. Click the Ms. Outlook 2003 icon, it will automatically check if there is an email in Outlook Express, select Upgrade form and then click Next.

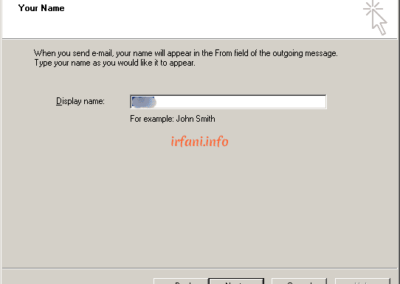
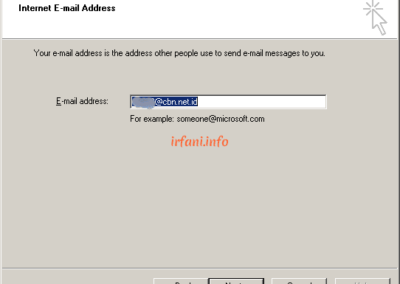
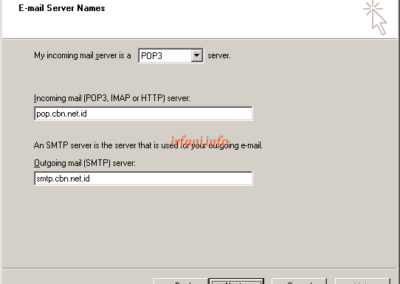
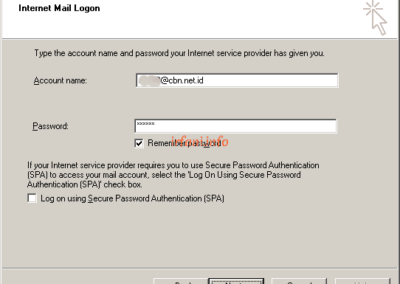
  1. Fill in the details of the email information obtained from the email provider as shown in the following image, then Next.
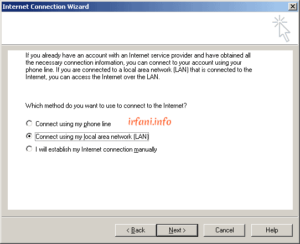
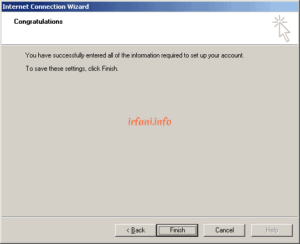
  1. Select Connect using my local area network (LAN), then Next and Finish.

  1. Select Yes and wait for the import process to complete (the import process depends on the number of emails and the specifications of the laptop/PC used).

Good luck, thank you.


TP-Link TL-WR941ND Router PPPoE Guide

TP-Link TL-WR941ND Router PPPoE Guide

Before following the following guide, make sure the position of the PC / laptop and LAN cable are correct as shown above.

Topology:

wall jack <—> (Internet/WAN port) router (Ethernet 1-4 port) <—> laptop / PC

                     <—> = LAN cable

Tool :

  1. PC/laptop with Dynamic IP
  2. Cable LAN
  3. Router


  1. Connect the LAN cable from the PC/laptop to the LAN port (1-4) on the router and make sure the status on the PC/laptop is connected and there are no crosses.
  2. Connect the LAN cable from the building/apartment/wall jack to the WAN/Internet port on the router.
  3. Open a browser to log in to the router by typing 192.168.0.1 (default IP) in the Address Bar, then Enter, make sure you know the username and password. If you have logged in, please go directly to step 5 but if the address 192.168.0.1 is not open or does not remember the router username and password, it is recommended to reset it (step number 4).

For other types of routers, you can see it on the sticker installed under the router.

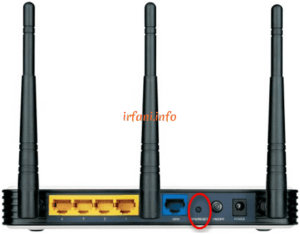
  1. To reset the router as it defaults, make sure the router is on and press the reset button on the back of the router for 5-10 seconds until the light indicator will flash at the same time.
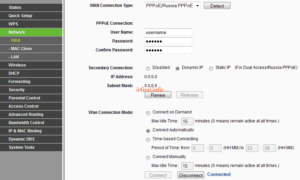
  1. On the left panel, select NetworkWAN and then select / fill in with:


WAN Connection Type : PPPoE/Russia PPPoE

User name : username-login

Password : password-login

Confirm password : password-login

Wan Connection Mode : Connect Automatically


After that, click Connect and make sure the status is Connected then click Save.


Until this step should be connected to the Internet, please try to open a site first, if successful please continue to step number 6 for wireless configuration.

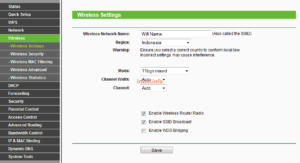
  1. On the left panel, select WirelessWireless Settings then select / fill in the following information then click Save.


SSID : wireless name

Region : Indonesia

Channel : Auto

Mode : 11bgn mixed

Channel Width : Auto

Max Tx Rate : 300 Mbps

Enable Wireless Router Radio : check if you want to activate the wireless feature

Enable SSID Broadcast : check if you want to display the wireless name
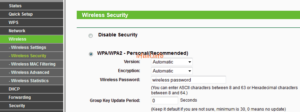
  1. To change the wireless password, select WirelessWireless Security on the left panel then select the fill in with the following information then click Save.


Select WPA-PSK/WPA2-PSK.

Version : Automatic.

Encryption : Automatic.

PSK Password : wireless password (minimal 8 character).


Until this step, you have successfully connected to the Internet via ethernet and wireless cables by entering the password first (for wireless).
Note :

There are some devices that are not compatible with the above configuration, you can do this manually by changing the selection that suits the device.

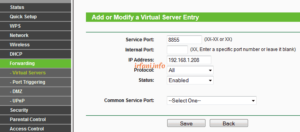
  1. If you want to use CCTV or other devices that require the Port Forward feature, select ForwardingVirtual Servers on the left panel then click Add New and fill in the following information then click Save:


Service Port : the port or range port to be used.

IP Address : The IP address of the device to be connected.

Protocol : All

Status : Enabled
Note :

Not all ISPs open the ports that will be used by the CCTV / other devices, for that you can consult the relevant ISP first.


Tested with TP-Link TL-WR941N / TL-WR941ND

Firmware Version : 3.11.8 Build 100609 Rel.61214n

Hardware Version : WR941N v2/v3 00000000


Can be used for:


TL-WR940N

TL-WR843ND

TL-WR842N / TL-WR842ND

TP-Link TL-WR841N / TL-WR841ND

TL-WR1043ND
TL-WR840N

TL-WR841HP

TL-WR743ND

TL-WR740N / TL-WR741ND

TL-WR710N

TL-WR720N

TL-WDR4300


Solution Cannot start Microsoft Outlook on Ms. Outlook 2007

Solution Cannot start Microsoft Outlook on Ms. Outlook 2007

This time I met again with Ms. Outlook 2007 who had a problem, namely the display appeared like the image above. The solution to this problem is quite easy because Outlook has provided the Scanpst.exe application  in the folder where Outlook is installed​.

In Ms. Outlook 2007, here’s how to solve the problem:

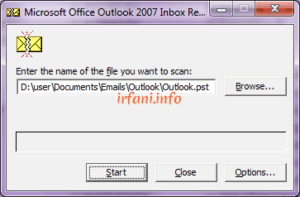
  1. Open the Scanpst.exe application  located in C:\Program Files\Microsoft Office\Office 12 or C:\Program Files(x86)\Microsoft Office\Office 12, click SCANPST.

  1. Click Browse, point to the location where  the .pst  file is located and click Start.

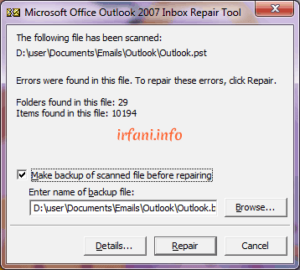
  1. The repair process will be done gradually with time depending on the size of the .pst file and the specifications of the PC/laptop. My .pst file size is about 200 MB and the specifications of a laptop with a Dual Core processor and 2 GB of RAM, taking about 1 hour.
  1. If the scan results are complete, then Outlook will offer to backup the .pst file before the repair is made. Click Repair for repair until Repair complete appears, then click OK.

  1. The repair is complete, please restart your PC/laptop and open Outlook again, the above display should not appear again. Good luck.


Solution Cannot create file in Ms. Outlook 2007

Solution Cannot create file in Ms. Outlook 2007

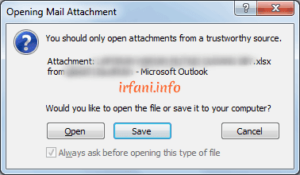
Have you ever gotten a view like the one below if you are using Windows 7 ? If yes, then you are reading the right article. Hopefully this article can help you to solve these problems, such as drug advertisements, hahaha.

The display is due to a problem with the temporary folder used by Ms. Outlook, the solution is only to change the location of the temporary folder. The effect of the problem is that we can’t open or save attachments in emails.

Here’s how to fix the problem in Windows 7 :

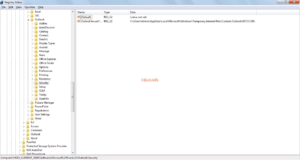
  1. Click Start then on Search program and files, type regedit and the result will appear the regedit program in the white column above it. Click the regedit.

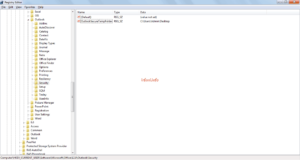
  1. Browse to : HKEY_CURRENT_USER\Software\Microsoft\Office\<version*>\Outlook\Security

*Customize <version> with: 16.0 (if Outlook 2016) / 14.0 (if Outlook 2010) / 12.0 (if Outlook 2007) / 11.0 (if Outlook 2003) / 10.0 (if Outlook XP).

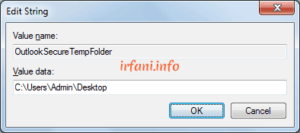
  1. Click twice on OutlookSecureTempFolder, then the Edit String window will appear. Change the value of the data with the latest location (example in this case: C:\User\Admin\Desktop), then OK.


  1. Close and reopen Ms. Outlook and please try again, the problem should not occur again. Good luck.

Note: in point 2 has been adjusted until Ms. Outlook 2016.


Windows XP PPPoE Guide

Windows XP PPPoE Guide

I made this guide if you experience problems such as a slow internet connection or inappropriate bandwidth where the current internet connection uses a router (which is generally used with other devices around at the same time). So it is expected to get maximum results by using only 1 device as a comparison with a router.

Please also make sure that the transmission media from the ISP (Internet Service Provider) is an RJ45 ethernet cable to connect with a PC/laptop device. The topology used in the guide is as follows, and can be adjusted to the conditions in the location:

ISP <–> wall jack <==> router become to ISP <–> wall jack <==> PC/laptop

<–> = transmission media

<==> = cable ethernet RJ45

  1. Disconnect the ethernet cable connected to the router and connect it on a PC/laptop. On a PC/laptop, make sure the Ethernet status is Enabled and not a cross, the LAN indicator will turn into an exclamation mark (as shown in the image above), if you still get a cross, you must check the LAN cable and the connected device again.
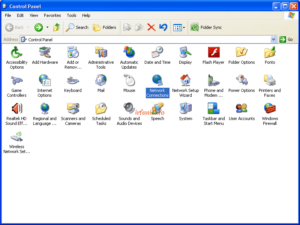
  2. On the Control Panel, select Network Connections.

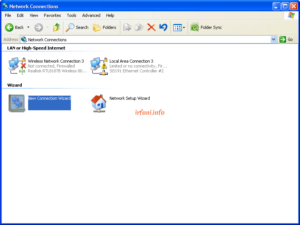
  1. Choose New Connection Wizard.

  1. Click Next and select Connect to the InternetSet up my connection manuallyConnect using a broadband connection that requires a user name and password and in ISP Name you can set it with the ISP name and then Next.
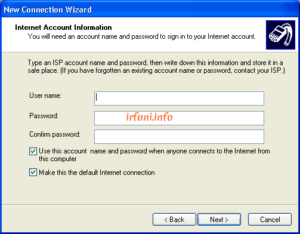
  1. Fill in the username and password provided by the ISP, then click Next.

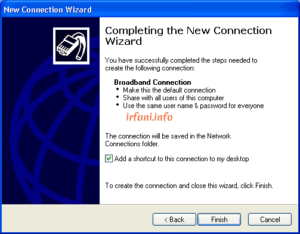
  1. Check Add a shortcut to this connection to my desktop to make it easier to click from Desktop and then Finish.

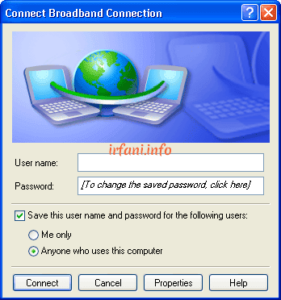
  1. A pop up will appear as follows (if the User name and Password have been filled in), you can immediately click Connect and if successful, a connected status will appear.


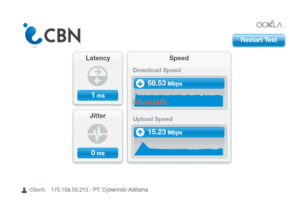
Until this step, we can immediately try the speedtest to make sure the bandwidth is appropriate.

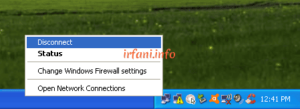
  1. To disconnect, right-click the LAN icon and select Disconnect.

If you are still experiencing slowdowns or inappropriate bandwidth, please contact  the relevant ISP. Good luck and a great day.